How to Set-up an Email Marketing Channel Successfully?
Detailed guide to set-up your email outreach channel for success

Email marketing remains a crucial tool for businesses, offering an impressive ROI. However, before you begin your outreach at scale, you need to ensure you have the right email infrastructure set up.
Here's what you need to know to accomplish the same 👇
Step 1: Set-up Marketing Domains
It is always advised to protect your main domain’s reputation by purchasing marketing domains for your outreach efforts and keeping your main domain for client and official communication.
For example if your primary domain is salesup.club, you can opt for the following alternatives as per your budget:
1. salesup.co
2.salesup.info
3.salesup.solutions
The following questions can help you finalize your domain set-up:
Where can you purchase marketing domains?
There are multiple platforms where you can purchase your domains, primary ones being:
1. Godaddy.com
2. Namecheap.com
We have personally seen better deliverability with domains bought from GoDaddy.
What's the cost of purchasing marketing domains?
The cost of each domain can vary from $5-$50 per year depending on the domain name your purchase
How many marketing domains should you purchase?
The number of domains you purchase depends on the number of emails you want to send out per week
For example, if you would like to send out 5000 emails per week, here's how you'd calculate your domain requirement:
| Total Number of Emails Sent Per Week | 5000 |
|---|---|
| Emails Sent Per Day Per Inbox | 10 |
| Number of Inboxes | 100 |
| Number of Domains | 50 |
Points to keep in mind:
1. Each email inbox should only send 10-15 emails per day
2. Each domain should only have 2-3 inboxes
You can understand how the domain calculation was done by clicking here.
Although you can begin by purchasing two domains. It is always suggested to purchase 10-100 domains and adding 2-3 emails to each when you’re looking to run emails at scale.
Step 2: Set-up Email Inboxes
Once your domains are purchased, emails can be set up using email hosting software.
Commonly used software include:
1. Gmail
2. Outlook.
The preferred software is Google due to better deliverability although it can be sensitive to automation software.
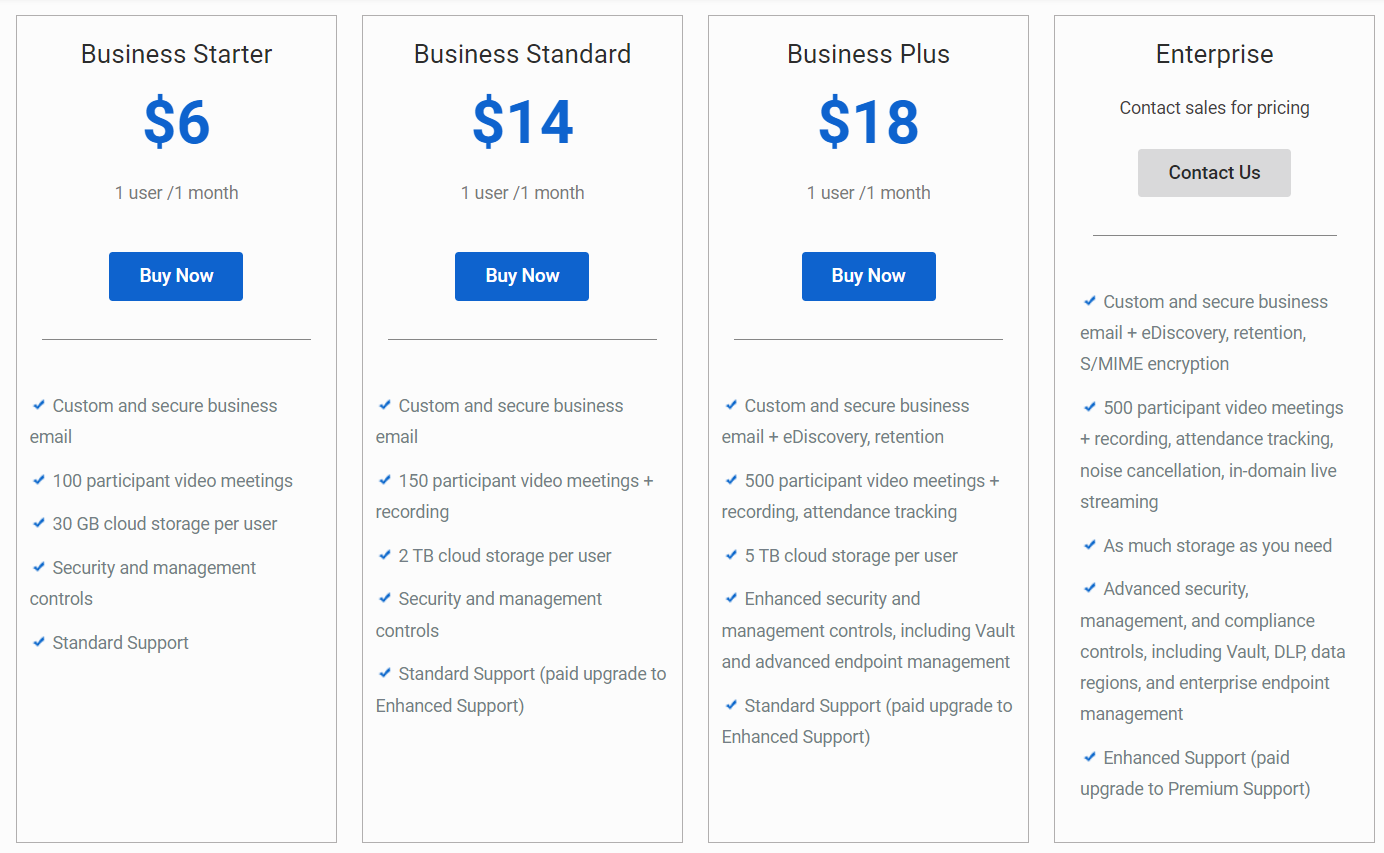
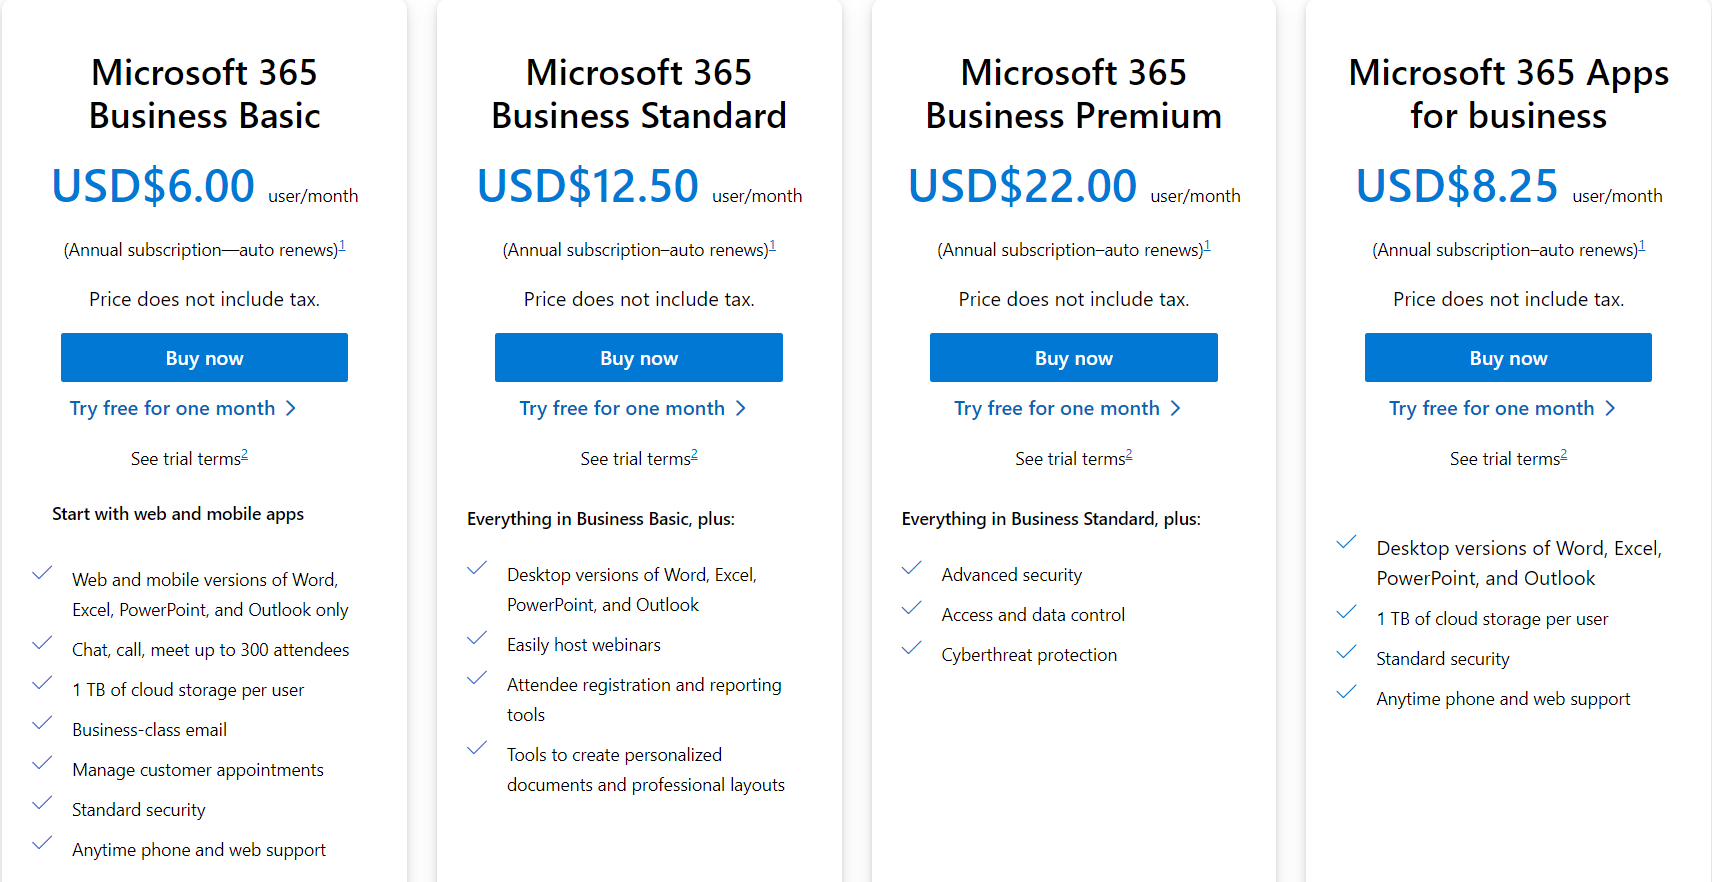
Once you’ve finalised the email hosting platform, we suggest purchasing 2-3 emails per domain so that if your domain were to be flagged, you only lose out on two emails.
Emails can be purchased in the starter/basic plan as it meets all requirements to conduct marketing outreach and comes at minimal cost:
Step 3: Authenticate Your Inboxes
Once your marketing domain and emails are setup, there are a few steps you can take to ensure that your cold emails land in the lead’s inbox, these include:
Setting up DKIM, SPF, DMARC and MX records:
| Item | Description |
|---|---|
| DKIM | This is an authentication method that lets email service providers know that your email is actually associated to your domain. |
| Sender Policy Framework (SPF) | Sender Policy Framework (SPF) is used to authenticate the sender of an email. With an SPF record in place, email server providers can verify that a mail server is authorized to send email for a specific domain. An SPF record is a DNS TXT record containing a list of the IP addresses that are allowed to send email on behalf of your domain. |
| DMARC | DMARC uses both DKIM and SPF listed above to decide whether the received email should land up in junk or be straight out rejected. It basically lets every email service provider know that the email you’ve sent is legitimate and sent by you. |
| MX Records | A mail exchanger record (MX record) specifies the mail server responsible for accepting email messages on behalf of a domain name. |
Here's how you can set each of these up:
DKIM:
• Gmail • Zoho • Outlook
SPF:
• Gmail • Zoho • Outlook
DMARC:
• Gmail • Zoho • Outlook
MX Records:
• Gmail • Zoho • Outlook
Warming up your emails before outreach:
Warming up emails before beginning your cold outreach is a must. This ensures that your domain deliverability is high, increasing your chances of landing in your lead’s inbox.
Standard warm-up procedure involves the following practice:
| Email type | Duration of warm-up | Email sent | Reply rate |
|---|---|---|---|
| Completely fresh emails | 2 weeks | 40 emails daily | 40-50% |
| Previously used emails | 1.5 weeks | 10-15 emails daily | 30% |
There are several tools in the market to warm up your emails, these include:
Mailreach • Warmy • Warmbox • Saleshandy • Mailivery • Warmupinbox • Mailwarm • Quickmail Autowarmer • Lemwarm • Saleshandy • TrulyInbox • Growbots • SalesBlink • Rift
Once, your emails are warmed up, the final step would be to add your emails to an automated emailing software to kickstart your email campaigns.
If you'd like to know more about the tools and costs involved to set-up email marketing, you can take a look at our email infrastructure workflows.